1. 스프링 시큐리티가 필요한 이유
은행을 생각합시다. 은행에는 수많은 보안이 있습니다. 보안 요원부터 24시간 돌아가는 CCTV와 금고까지... 은행을 이토록 보호하는 이유는 무엇일까요? 바로 은행에는 귀중한 가치인 금과 돈이란 자산이 있기 때문입니다.
이처럼 우리의 프로젝트에는 고객들의 귀중한 가치인 데이터가 있습니다. 그리고 이를 지키기 위해 우리는 무언가 조치를 취해야 합니다. 그래서 등장한 것이 스프링 시큐리티 프레임워크입니다.
2. 스프링 시큐리티 흐름
서블릿과 필터
자바 웹 어플리케이션 안의 필터는 서블릿 컨테이너의 요청과 응답을 가로챌 수 있습니다. 이로 인해 어플리케이션의 핵심 비즈니스 로직이 실행되기 전에 특정 작업을 수행할 수 있습니다. 스프링 시큐리티는 이런 필터를 사용해서 웹 어플리케이션 내에 정의된 구성 정보(Configuration)를 바탕으로 보안을 강화합니다.
흐름과 시퀀스

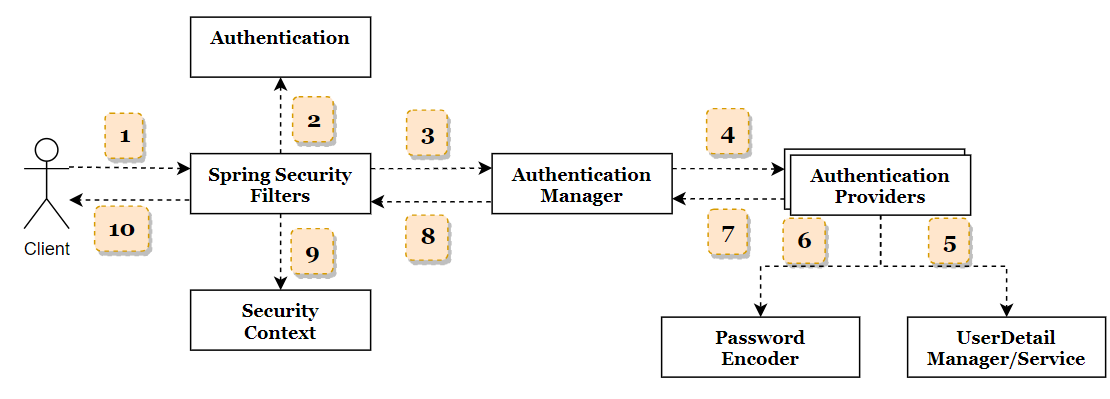
1. Spring Security Filters
Spring Security Filter들은 요청을 가로채고 인증이 필요한지 아닌지 확인합니다. 만약 인증이 필요하면 사용자 로그인으로 안내하거나, 인증받은 정보가 있다면 기존의 정보를 사용합니다.
2. Authentication
UsernamePasswordAuthenticationFilter와 같은 필터는 HTTP 요청에서 username과 password를 추출해 Authentication 타입 객체를 준비합니다. 인증(Authentication)은 스프링 시큐리티 프레임워크 안에서 인증된 사용자의 세부 정보를 저장하는 클래스입니다.
@Override
public Authentication attemptAuthentication(HttpServletRequest request, HttpServletResponse response)
        throws AuthenticationException {
    if (this.postOnly && !request.getMethod().equals("POST")) {
        throw new AuthenticationServiceException("Authentication method not supported: " + request.getMethod());
    }
    String username = obtainUsername(request);
    username = (username != null) ? username.trim() : "";
    String password = obtainPassword(request);
    password = (password != null) ? password : "";
    UsernamePasswordAuthenticationToken authRequest = UsernamePasswordAuthenticationToken.unauthenticated(username,
            password);
    // Allow subclasses to set the "details" property
    setDetails(request, authRequest);
    return this.getAuthenticationManager().authenticate(authRequest);
}
실제 UsernamePasswordAuthenticationFilter 객체의 메소드입니다. 해당 메소드에서는 POST 방식으로 넘어 왔는지, username과 password가 null인지 등등을 체크합니다.
다음으로 UsernamePasswordAuthenticationToken 객체를 만들어 이것을 인증 관리자( AuthenticationManager) 객체의 authenticate 메소드의 파라미터로 넘깁니다.
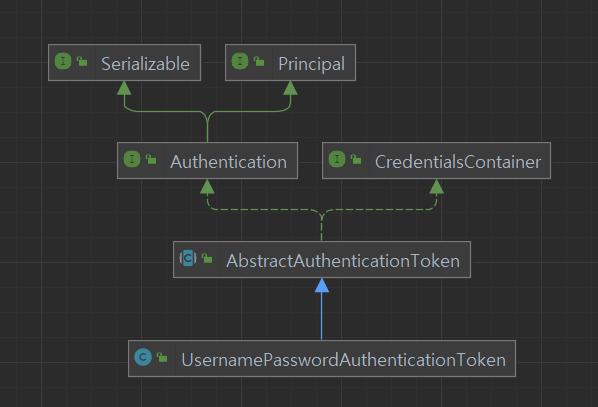
하지만 Authentication을 넘기지 않고 토큰을 넘기는 군요?

인텔리제이 다이어그램의 힘을 빌렸습니다. 상속도를 보면, UsernamePasswordAuthenticationToken객체는 Authentication 인터페이스를 구현한 객체인 것을 알 수 있습니다. 즉, 이 토큰 객체는 인증(Authentication) 인터페이스를 구현한 객체인 것을 알 수 있습니다.
3. AuthenticationManager
필터로부터 요청을 받으면 AuthenticationManager는 요청 받은 사용자의 세부 정보를 유효성 검사하기 위해서 요청을 Authentication provider들에게 위임합니다. 애플리케이션 내에 여러 provider가 있을 수 있으므로 Authentication Manager는 사용 가능한 모든 Authentication provider들을 관리하는 책임이 있습니다.
public interface AuthenticationManager {
	Authentication authenticate(Authentication authentication) throws AuthenticationException;
}
AuthenticationManager는 인터페이스입니다. 아까 위의 2번 과정의 코드에서 authenticate 메소드에 토큰을 넣었는데, 토큰이 Authentication의 구현임을 알 수 있었습니다.
public class ProviderManager implements AuthenticationManager, MessageSourceAware, InitializingBean {
	... 코드 생략
}
ProviderManager는 AuthenticationManager를 구현한 객체입니다. 현실 세계에서 Manager의 역할이 관리하고 조율하는 역할인 것처럼, 여기서도 ProviderManager의 역할은 모든 Authentication Provider, 개발자가 정의한 Authentication Provider와 상호작용하는 것입니다.
실제 ProviderManager의 authenticate 메소드의 오버라이딩된 모습을 보면, for문을 통해 사용 가능한 Provider를 탐색하는 코드가 있습니다.
4. AuthenticationProvider
AuthenticationProviders에는 사용자의 세부 정보를 유효성 검사하는 모든 핵심 로직이 있습니다.
5. UserDetailManager/Service
UserDetailManager나 UserDetailService는 사용자 세부 정부를 데이터베이스나 스토리지 시스템으로부터 검색하고, 생성하고 업데이트하고 삭제하는 것을 도와줍니다.
6. PasswordEncorder
비밀번호를 인코딩하고 해싱하는 것을 도와주는 서비스 인터페이스입니다.
7. SecurityContext
요청이 인증되면 일반적으로 Autentication(인증)은 SecurityContextHolder가 관리하는 스레드 로컬 SecurityContext에 저장됩니다. 이는 동일한 사용자의 요청을 처리하는 데 도움이 됩니다.

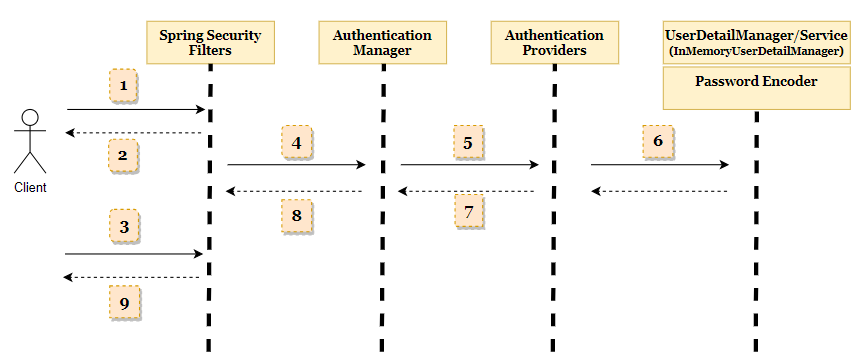
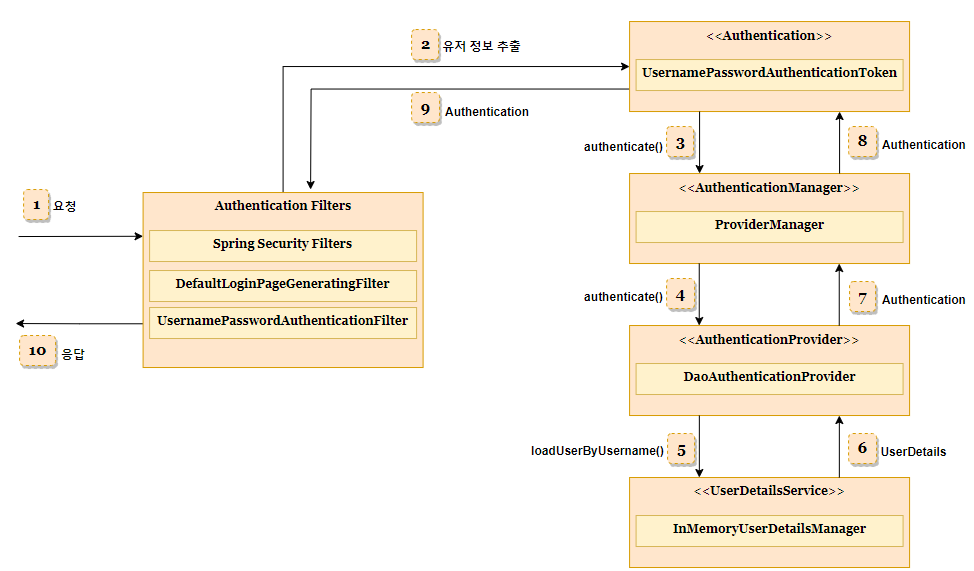
1. 사용자가 보안이 적용된 페이지에 접속합니다.
2. 뒤에서 AuthorizationFilter, DefaultLoginPageGeneratingFilter와 같은 몇 가지 필터는 사용자가 로그인하지 않은 것을 식별하며, 사용자를 로그인 페이지로 리다이렉트 시킵니다.
3. 사용자가 본인의 정보를 입력하면, 해당 요청은 필터에 의해 가로채집니다.
4. UsernamePasswordAuthenticationFilter와 같은 필더들은 username과 password를 요청으로부터 추출하고, Authentication 인터페이스를 구현한 UsernamePasswordAuthenticationToken의 객체로 형성합니다. 객체가 생성되면 ProviderManager의 authenticate() 메서드를 호출합니다.
5. AuthenticationManager를 구현한 ProviderManager는 주어진 Authentication providers의 목록에서 사용가능한지 확인합니다. 아무런 설정을 하지 않는다면 기본으로 ProviderManager는 DaoAuthenticationProvider의 authenticate() 메소드를 호출합니다.
6. DaoAuthenticationProvider는 InMemoryUserDetailsManager의 loadUserByUsername() 메소드를 호출하고, 사용자 세부 정보를 메모리에 로드합니다. 사용자 세부 정보가 로드되면, 기본 password encoder의 도움을 받아 암호를 비교하고 사용자가 인증되었는지 여부를 확인합니다.
7. 인증에 대한 성공 여부의 정보가 담긴 인증 객체를 ProviderManager에게 리턴합니다.
UserDetailsManager 훑어보기
https://jaykaybaek.tistory.com/27
8. ProviderManager는 인증이 성공했는지 실패했는지 체크합니다. 만약 실패했다면, 사용 가능한 다른 AuthenticationProvider들에게 다시 시도합니다. 성공했다면, 간단하게 인증 정보를 필터에 리턴합니다.
9. 나중에 사용하기 위해 필터로부터 인증 객체가 SecurityContext 객체로 저장되며 응답이 사용자에게 리턴됩니다. 같은 사용자가 다시 요청할 때에는, SecurityContext의 위의 과정을 반복하지 않고 인증 객체를 활용하여 처리합니다.

전반적인 플로우차트를 끝으로 포스팅을 마치겠습니다.
'Spring Security' 카테고리의 다른 글
| [Spring Security] 로그인/로그아웃 구현 및 타임리프 적용 (2) | 2023.07.05 |
|---|---|
| [Spring Security] 인증(Authentication), 인가(Authorization), 권한(Authority), 역할(Role) 알아보기 (0) | 2023.06.19 |
| [Spring Security] CORS, CSRF란? (0) | 2023.06.14 |
| [Spring Security] Password Encoder 알아보기 (0) | 2023.06.12 |
| [Spring Security] UserDetailsService와 UserDetails 및 Authentication의 차이점 (0) | 2023.06.10 |


